
Blogging :
Blogging will never be out of fashion, what will be are the blogging platforms. With tons of great blogging platforms, I
am not here to discuss which would be the best one but rather I would like to discuss a relatively young blogging tool - Jekyll.
Some advantages of moving to Jekyll
- Simplicity : Easy set-up, hosting and management of your website.
- No database : Unlike WP and other CMS, Jekyll doesn’t have a database to be managed.
- No CMS : Write your articles in markdown, git commit, git push. That’s it !
- Fast : Experience it yourself.
- Minimal : Super light-weight and easy to mange.
- Convenient hosting : GitHub takes care of hosting your website/blog
- Personal Domain : Linking up your personal domain is free !
Local Setup :
We would need the following tools to be installed on our local machine.
1) Sublime text editor : To edit html and css files. ( You may use notepadd++ or any other editor too )
2) Git bash : To Checkout your repo and make changes locally. We will first test our blog on a local server then push it to GitHub.
3) Install Ruby : Only needed for windows as mac users have it pre-installed. Also, download the dev kit.
4) Install devkit : Only for windows.
5) Install Jekyll using the following command :
gem install Jekyll
If the above installation fails due to SSL error, then use this the below command. (Using http instead of default https)
gem install Jekyll --source http://rubygems.org/
Setting up on GitHub :
As a GitHub user, you are entitled to one free user website as opposed to Project websites. GitHub will by default host it on.
http://yourusername.github.io
Create a repo - yourusername.github.io on GitHub. Clone it on the local machine. Create a index.html and push it in your repo ! That’s it ! GitHub will automatically build your site after every check in. What we have created is a static website.
Now let’s create our dynamic Jekyll blog.
You may download a template of your choice from the following websites :
Or you can fork an existing blog/website. For example here is my blog’s repo. I suggest you create your own blog and use my blog just as a reference. If you still want to fork it
, go ahead and do it but PLEASE DO NOT FORGET TO CHANGE the following files : CNAME, _config.yml of course along with personal images and other blog posts !
After choosing the theme, push your Jekyll template to your repo yourusername.github.io.
To test it locally run the following command from your root directory.
jekyll serve --watch
Check your website on :
http://127.0.0.1:4000/
Configuring your own domain :
This is the coolest part as some blogging platforms charge you a fee for linking a custom domain. GitHub provides you this feature for free !
We will need to do two things here :
- Tell our GitHub repo what our domain name is : Create a CNAME file in your root directory. Simply add your domain name in it. Mine contains
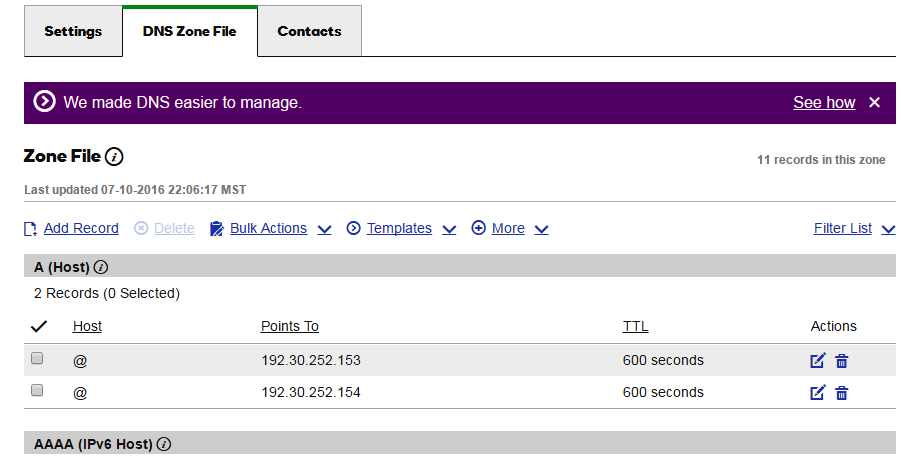
anandjoshi.me. That’s it. - Tell our DNS where our website is hosted : You need to configure A-record with your DNS provider.
Dashboard

A record
Add the following ips address to your record.
Troubleshooting :
If somehow you are not able to view your blog after following the above points then please check your A-record. It should only have the above-mentioned records and not anything else. Even after that if you have any trouble then use this guide to troubleshoot your blog.
Creating a custom google search engine for your blog
Create a page where search results will be displayed to your users. Get your custom id from CSE site.
---
layout: default
permalink: /search/
---

<div id="home-search" class="home">
     <script>
         (function() {
             var cx = '<Your CSE id>';
             var gcse = document.createElement('script');
             gcse.type = 'text/javascript';
             gcse.async = true;
             gcse.src = (document.location.protocol == 'https:' ? 'https:' : 'http:') +
             '//www.google.com/cse/cse.js?cx=' + cx;
             var s = document.getElementsByTagName('script')[0];
             s.parentNode.insertBefore(gcse, s);
         })();
     </script>
     <gcse:search queryParameterName="searchString"></gcse:search>
</div>
Now create html layout for search form where the user would enter the query.
Customize css as per your blog design.
Include this layout on the pages you would want search feature.
  <div id="search" align="center" style="margin-top:20px;">
  <form role="search" method="get" action="/search/" class="form-inline">
     <div class="form-group">
       <input style="height:36px;font-size:12pt;width: 100%"; id="searchString" name="searchString"
              placeholder="Search on this blog..." type="text"><br/>
       <input style="width: 100%" class="btn" id="searchButton" name="googleSearchName" type="submit" value="Search">
     </div>
  </form>
</div>
More resources :
- Refer to the template to create a sitemap for your blog.
- Add pagination to your blog.
- Learn markdown : Pretty useful for writing your posts.
- Free course to set-up a jekyll blog.
Thank you very much for following this guide. Hope it was useful. Please add your suggestions, views, problems or any cool Jekyll tips that you have here in comments. :)